A Great Book

0

Posted by Sara | Posted in Book Reviews, Indoor Gardening, Outdoor Gardening, Seed Starting, Transplanting | Posted on 09-02-2011

Tags: , , , , , , , , ,

I have a new favorite book!

I think I have mentioned it before but it deserves another mention.

Month-By-Month Gardening in Minnesota!!!!!!!!!!!!!!!!!!!!!!!!!!!!!!!!!!!!! By, Melinda Myers. ISBN-13: 978-1-59186-253-6

ISBN-10:1-59186-253-1

Suggested Retail is $24.99 and worth a LOT more than that!

Here are just a few of my favorite features:

  • It covers every type of plant, veggie or herb and provides month by month instructions for them specifically!
  • In the Veggie and Herb section there is a late planting chart which tells you your last date to plant your second (or a rotation) planting in order to harvest before common Minnesota frost dates.
  • Great seed starting and transplanting dates and what you can put right in the ground in MN.
  • So many “Helpful Hints” and creative suggestions I would have NEVER thought of it could make your head spin!!!

So, if you’re looking for some serious information for Minnesota gardening of all sorts please grab a copy of this wonderful book. I just love looking through it.
Indoor Gardening Winter 2010-2011

0

Posted by Sara | Posted in Indoor Garden Progression, Indoor Gardening | Posted on 06-02-2011

Tags: , , , , , , , , ,

Hello fellow gardeners!

I haven’t been around in a bit, but I am ready to dig back in and get started!

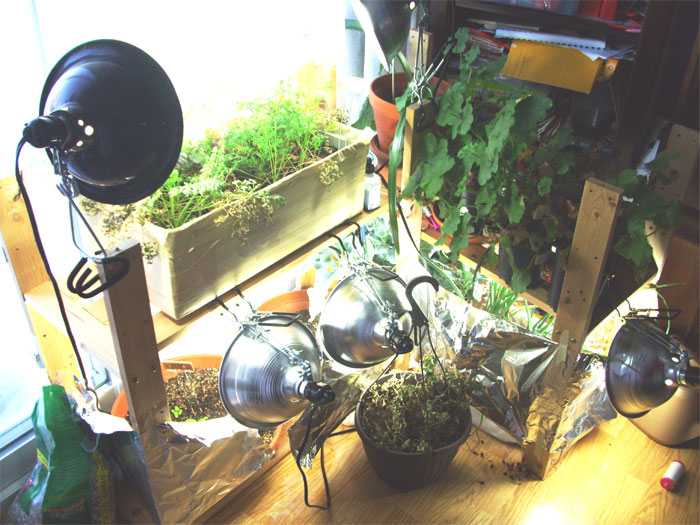
For this first (gardening) post back I will show you my indoor garden that is thriving this year!

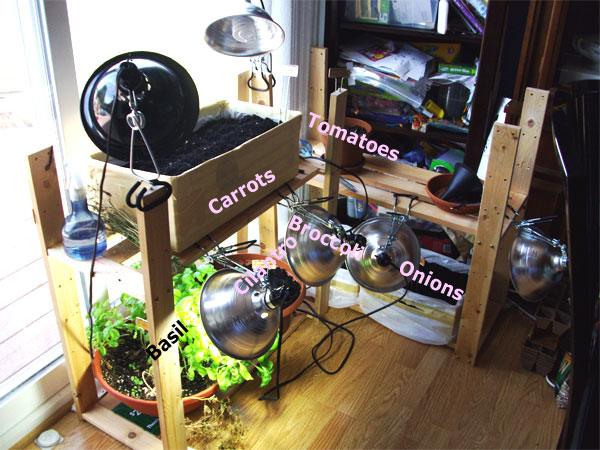
Here’s a picture:

Indoor Garden Winter 2010-2011

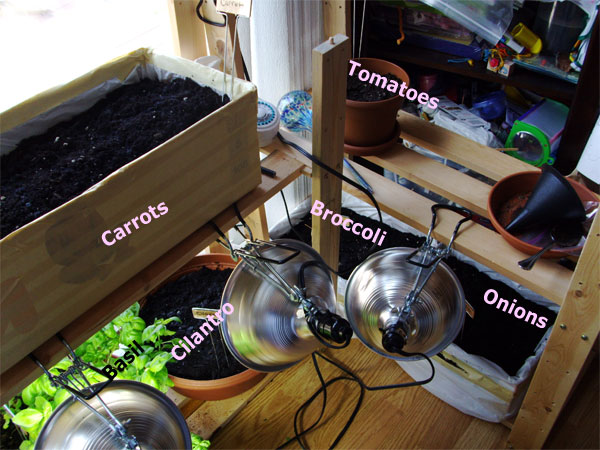
In the top left you can see the carrots. Some of them are just about ready. They are the long thin Danvers variety. I tried a few types in the garden last season and these are the best growers so I decided to see if I could get them to grow over the winter. They’d better hurry up though because I need the space and the light for some seeds starting in February!

On the bottom left you can see my herb garden. I recently restarted it. It was getting over grown and got destroyed by some spider mites before I realized what was going on. I have new Sweet Basil and Cilantro seeds/seedlings in there.

On the top right I am wintering over my red Geraniums. Two of which fell victim to the spider mites before I had a chance to stop it. They are doing great though. I don’t water them very often and they seem to like that for wintering over.

On the bottom right (in back) I have some thriving Broccoli, which also had better hurry up and get some heads going! The plants them selves are doing great, so any time now!

On the bottom in front I have yellow onions. These guys need a lot of sunlight so I will probably not do them again over the winter. They are doing just great, just going very slowly and I have a feeling the layers are going to be quite thin because they need the sunlight to get them pumped up.

The dead thing in the front was a really nice Petunia which was on it’s second life with seeds from the original plant! It got taken over by the Spider Mites like crazy. I have a feeling that either the Basil or the Petunia was the origin of the infestation.

Notes: There are several safe controls for spider mites and other bugs for indoor gardens out there in the garden centers. Look for ones especially for vegetables and edible plants. They are the safest.

Look at the calendar for the seed planting and starting and other important dates!

Thanks for stopping by,

Sara Murray

Indoor Garden 2010 IN!

0

Posted by Sara | Posted in Indoor Gardening | Posted on 01-09-2010

Tags: , , , , , , , , ,

Hi everyone,
It has been hard to keep the posts coming when there is so much to do in the summer! I found it much easier to post when I was trapped indoors just wishing it was summer. 🙂

That being said, I have started my indoor garden 2.0!

This garden contains things that I know will grow well indoors. These plants will be ready to harvest right around Christmas time or a little after. Once these plants are harvested I will plant starter seeds for the outdoor garden. (I am just starting to get a good harvest from the outdoor garden.)

I have planted Basil, Cilantro, Short Carrots, Yellow Globe Onions, Broccoli, and I will plant tomatoes as soon as I find a suitable variety. I am looking for a short bushy determinate plant!

I used old cardboard boxes, taped all over, and lined with garbage bags because I could not find a good size any where to buy. My original idea being to use window boxes. I am hoping to get one season out of them and also hoping that they don’t rot or melt before I harvest!!

Here are the harvest times for all of the above:
Basil (it’s still going from last winter so that’s up)
Cilantro 30 days
Carrots 68 days
Onions – says transplant at 8-10 weeks, so maybe 90+ days to full globe
Broccoli 48-85 days

I have found that it takes longer with artificial light to harvest. So we’ll see!

Petunias From Seed

0

Posted by Sara | Posted in Indoor Gardening, Outdoor Gardening, Seed Starting, Transplanting | Posted on 01-06-2010

Tags: , , , , , , , ,

I started some petunias from seed this year and I learned a lot about them!

They are picky little things! They need the soil to be very very warm to germinate. So a seed tray warming pad is essential. I thought that most of mine were duds until they sat outside in a 90 degree day and ALL germinated!

They like to be wet all the time and never really dry out between waterings.

I also learned that it takes 6 months for the seedlings to become the small plants you see in the garden centers. Amazing. So they are very slow growing. In order to have petunias for next summer I would need to start seeds indoors around October or November at the latest!!! (Which I intend to do by they way!!!)

Thanks for stopping by ~ Sara

Indoor Tomatoes Have Fruit!

0

Posted by Sara | Posted in Indoor Garden Progression, Indoor Gardening | Posted on 27-05-2010

Tags: , , , , , , , ,

My indoor tomatoes have fruit on them!

I had to pollinate them myself when they had blossoms. I have never done this before but I must have done it right because the tomatoes came. 🙂 I did it with a spoon so I could catch the pollen and redistribute it to the other blossoms without dropping it.

I have three tomatoes and as soon as these babies can be eaten I am going to take pictures, eat them, and then get rid of these HUGE monster tomato plants.I think they would be up to about 5 feet tall if they weren’t falling all over themselves.

(I learned the hard way that the smaller the tomato the taller/larger the plant, most of the time.)

I will keep you posted!

Thanks for stopping by ~ Sara

TOMATO Blossoms!

0

Posted by Sara | Posted in Indoor Garden Progression, Indoor Gardening, Seed Starting | Posted on 05-05-2010

Tags: , , , , , , , ,

I finally got my tomatoes to blossom indoors!

Now for some pollination. I may have missed the boat on a few flowers which have already closed, but I have hopefully pollinated the rest. My pollinator of choice: a spoon. Lots of people use a tooth pick or similar point structure. I prefer a spoon so I can see and catch the pollen and make sure it sticks to the stamens to transfer it! 🙂

Happy pollinating!

Maybe next year I will just put my seed starting shelf right in my green house. Never mind that I will have to shovel feet of snow to get to it!!!

Thanks for stopping by!

~Sara

Indoor Garden 4-14-2010

1

Posted by Sara | Posted in Indoor Garden Progression, Indoor Gardening | Posted on 20-04-2010

Tags: , , , , , , , ,

Hi everyone!

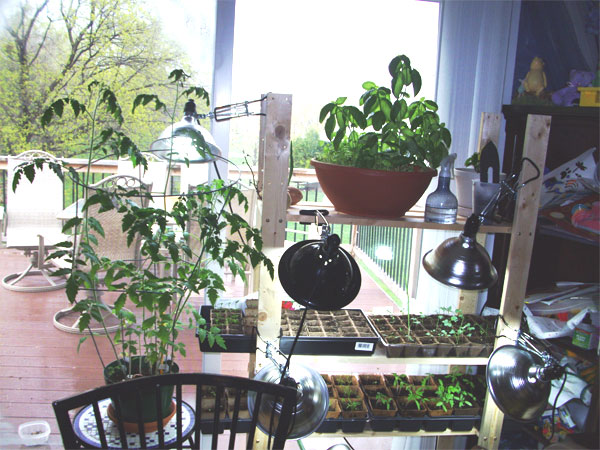
I have an updated picture of the indoor garden for you! It is growing like mad, and it’s so neat to have a bit of summer right in my dining room.

The giant monster tomato plants (started Feb 1st) that are actually pretty normal size are on the far left. On the very top of the shelf is the potter that has the cilantro and basil (started Feb 1st) which are still going strong and I have had several small harvests out of!

The next shelf down from L-R are seedlings (started March 27th) of jalapenos, alyssum, petunias (regular ones that are still hard to germinate and extremely small and slow growing so far), bell peppers, broccoli, and large yellow onions.

Next shelf down are seedlings of alyssum, carrots, and 3 different varieties of tomato plants.

(The alyssum was started some time at the end of March.)

Everything that you see besides the large tomato plants and the cilantro and basil at the top will be transplanted some time around May 20, which is our frost-safe date according to the farmer’s almanac!

In a few weeks I will do another short video before I do the transplant so you can see how big they get before I transplant them.

Thanks for stopping by!

~Sara

Attack of the Monster Tomatoes!!

0

Posted by Sara | Posted in Indoor Garden Progression, Indoor Gardening | Posted on 15-04-2010

Tags: , , , , , , , , ,

Well, in my effort to take tomatoes from seed to table 100% indoors I have created some monster tomato plants! Very tall, about 90% healthy, but no flowers to speak of…yet. Check it out:

Large Tomato PlantsThese babies (there are 4 large  and one small one that took longer to germinate than the rest) are over 2.5 feet tall. I am not sure if they just seem larger because they are inside rather than out, but they sure are HUGE in my little dining room!

I have been gradually increasing the amount (time) of light they get in a day in an effort to get them to flower, and tonight I will be employing the use of my timer to get them on a consistent schedule. I checked the seed packet and it was not very helpful at all in telling me how tall these plants would be or if they were indeterminate (keep growing taller and have flowers throughout the plant) or determinate (form flowers at the top and stop growing). They seem to have a more condensed cluster at the top of the plant and have slowed down in growth a lot the last few days, so I am going to go with they are determinate plants.

Some valuable information that I got here (University of Ill. Extension) about the salad varieties does point to them having a longer time to flower/harvest than larger more typical types of tomatoes:

Super Sweet 100 (70 days to harvest; 1 inch; red, cherry-sized fruit in large clusters; indeterminate; resistant to VF)

Sweet Million (65 days; 1 inch; red, sweet, crack resistant; large clusters; indeterminate; resistant to FNT)

Yellow Pear (OP) (70 days; 1 inch; clusters of yellow, pear-shaped fruit; indeterminate)

Large Red Cherry (OP) (70 days; 1-1/2 inch; solid, deep red, tasty fruit; indeterminate)

Mountain Belle (65 days; 1 1/4 inch; red, crack resistant, ripens uniformly and holds on the vine; determinate; resistant to VF)

I don’t know what variety(s) I have. The packet just says “Salad Mix.” It looks like I could even have a mix of determinate and indeterminate tomatoes! I chose the salad variety to try out first because with the fruit being smaller I thought maybe the overall plant would be smaller as well. But it turns out that the plants are taller and take longer to fruit than other varieties! Go figure!

So, I am now going to increase their light to 18 hours+ and see if they flower! (Cross your fingers). For my next indoor tomato experiment I will be hunting for a small condensed determinate plant of some sort!!!!

Thanks for stopping by!

~Sara Murray

Lighting change

0

Posted by Sara | Posted in Indoor Garden Progression, Indoor Gardening, Outdoor Garden Progression | Posted on 05-04-2010

Tags: , , , , , , , , ,

So, I have discovered that tomatoes need a lot of light. Mature plants need more light especially if they are going to flower/fruit soon. So I am increasing the light on my mature plants to 18-20 hours per day. That should get them to flower/fruit. 🙂

The seeds and seedlings that I have started for outdoor transplanting will still have 12-16 hours of light until they are larger.

I am also going to fertilize the mature tomatoes for 2 weeks when I water them. That should give them enough nutrients to flower.

I will keep you up dated on their progress!.

Potting Soil and other things :)

1

Posted by Sara | Posted in Indoor Gardening, Outdoor Gardening, Seed Starting, Transplanting | Posted on 03-04-2010

Tags: , , , , , , , , ,

So, I have discovered a few things about potting soil, and seed starting soil etc… that I want to share with you!

Seed starting soil:

  • Already has fertilizer in it! Unless your soil is over 6+ months old do NOT use a fertilizer when you water!
  • Seed starting mix has a lot of Peat Moss in it, which can throw off the Ph of your soil a bit if you don’t transplant right away. I have found in particular that it is deficient in Calcium. I remedied mine by adding a 50/50 solution of milk and water to one watering. I will also add some egg shells to the top of the soil next time I have some. This can also save tomatoes from blossom-end rot.

Potting Soil

  • Not only does potting soil generally come with fertilizer already in it, you can get different kinds of fertilizer, and different kinds of mixes. Read the package well so that you understand exactly what you are getting!
  • Testing the Ph of your soil in this case is also important. Simply by being on the shelf in that plastic package for too long can throw off the Ph.

Hopefully you can learn from my mistakes and not end up burning your plants or having them wilt due to being calcium deficient!

Thanks for stopping by!