Minnesota Under a Frost Warning

1

Posted by Sara | Posted in In The Greenhouse, Outdoor Garden Progression, Outdoor Gardening | Posted on 15-09-2011

Tags: , , , ,

Parts of Minnesota are under a frost warning tonight.

Here’s what you can do to protect your plants:

  • Cover warm weather plants like tomatoes, peppers and squash with bed sheets.
  • Water your garden early in the day. You want the plant to be dry when night comes, but you also want the ground to be moist and the plant to be well watered.
  • Build a PVC structure and put clear plastic sheeting over it making a greenhouse right over your plants!
  • Pot up plants and put inside or in your greenhouse.
  • If all other options are not possible harvest every vegetable you can and hope for the best!

I have done 4 of the above. I watered early this morning and all my plants are now dry, and well watered. I spent most of the day making pesto from my basil and freezing it. Basil is especially vulnerable to frost damage. I also harvested every descent sized tomato regardless of color. I make 2 quarts of salsa and froze that too. I potted 2 tomato plants and put them in the greenhouse. I also covered another tomato plant, my eggplant, and one bell pepper plant with bed sheets.

Now all we do is wait and see. It is QUITE cold out there compared to 4 days ago when it was in the 90’s!!

Talk to you in the morning. I would love to hear how everything looked in the morning for you all! Post something in the forum for it.

Sara Murray

Frost…

0

Posted by Sara | Posted in Outdoor Garden Progression, Outdoor Gardening, Pests and Problems | Posted on 07-09-2011

Tags: , , ,

So, the time has come to discuss the issue of frost and how we (in the North) are going to extend this season and try to get our tomatoes to ripen on the vine!!

Last year I tried to create a greenhouse with greenhouse plastic, PVC pipe and packing tape around my entire garden. It was working great until a wind storm in early October when it all came crashing down and had to be taken down and off of the garden.

This year I plant to eventually pot up the tomato plants that are doing well and put them in the greenhouse! (The actual greenhouse that I bought in the early Spring.) But before I need to do that there are plenty of warm days left. When day-time temps get below 55 I will move them to the greenhouse. Over night temps are sometimes dipping into the 40’s now though.

So, I am going to go to my local hardware store and get some frost cloth. I have my tomatoes on very tall stakes, and I am going to get a few more that are even taller. I will drape the frost cloth over the stakes and hope for the best!! (Pictures coming soon.)

Wish me luck – I still have several dozen tomatoes in the garden, as well as jalapeno and bell peppers, and 4 lovely eggplants I need to save!

Back To The Cold Weather Veggies!

0

Posted by Sara | Posted in In The Greenhouse, Outdoor Garden Progression, Outdoor Gardening | Posted on 01-09-2011

Tags: , , ,

The only difference between gardening in the early Spring and gardening in the Fall are the mosquitoes!!

So I cleaned out my raised beds and planted the cold weather vegetables again. The warmer vegetables like tomatoes, peppers, squashes will all need a frost blanket. But the salad greens like spinach, kale, and arugula will all do really well again! Even radishes will get another batch once it gets really cold.

So in May I took the plastic that I had over my raised beds and rolled it off and stored in on the side of each bed. I am guessing I will get another few weeks and then I might have to put it over during the night time hours. I want to keep those salad greens above 45 degrees Fahrenheit. We had one night time temp of 55 last week already!! It went back up, but Minnesota is known for it’s temperature swings.

So, backward we go into Fall and Winter. Thinking about greenhouse, and plastic and frost blankets. 🙂

Tell us what you’re doing this Fall to prepare your garden for the winter in the forum!

Thanks for stopping by,

Sara

Free Tomato Plants!

0

Posted by Sara | Posted in Outdoor Garden Progression, Outdoor Gardening, Transplanting | Posted on 24-08-2011

Tags: ,

I have several tomato plants that I need to get rid of. I dug them out of my vegetable garden last night to create some space between my existing tomato plants. There is one pear tomato plant, the rest are standard tomato plants. They are ALL producing tomatoes (green still).

They have been raised organic, never sprayed with anything. They are from NON-GMO organic seed stock http://www.stclareseeds.com/ a great company which has signed the safe seed pledge. So you could even save these seeds and get awesome tomatoes year after year! 🙂

Let me know where you planted them, and if you liked the tomatoes they produced! Join the forum and talk gardening with us all year round.

Thanks for stopping by

-Sara

Carrots + Raised Beds = LOVE

0

Posted by Sara | Posted in Outdoor Garden Progression, Outdoor Gardening, Pests and Problems | Posted on 24-08-2011

Everyone knows that carrots love sandy pliant soil. I have tried them for many years with good success in the germination and health of the plant factors, but not so good in the actual root being a nice long carrot factor.

Carrots will turn and get knotty at the least resistance in the soil. You need to provide an easy path for these guys or you will have a knotty twisted mess of a carrot to try to peel!

For me the raised bed was the ultimate solution. I built square frames from 8×1 inch remnant wood and created a nice carrot friendly soil in that. I did not have to disturb the other soil which normal veggies can’t handle. I mixed in pearlite, sand, black dirt and manure to make a nice extremely soft bed of dirt for the carrots to go into. I planted straight from seed (which in Minnesota is sometimes not able to get any result because the season is so short). And I have some AWESOME carrots coming up right now because of all my hard work in preparing that bed.

If carrots are royalty then the carrot is the princess. It’s can’t handle any resistance, even deep down in the soil (this is a weak reference to princess and the pea!) 🙂 So, if you’re going to do carrots be prepared, or stick to short varieties.

Hired a Gardener to help me WEED!

0

Posted by Sara | Posted in Outdoor Garden Progression, Outdoor Gardening, Pests and Problems | Posted on 23-08-2011

Tags: , ,

So after letting my vegetable garden get completely away from me I finally hired someone to come help me out.

His name is John Beall (pronounced “bell”) and he did a wonderful job and was very fast as well. Very reasonably priced. We talked about gardening a bit and he had a lot of neat things to share about it. I found him in the gardening services on the Twin Cities Craig’s List here: http://minneapolis.craigslist.org/dak/fgs/2552468878.html

I highly recommend him! Now I can get out there and work on the projects I really want to be doing. Like staking my HUGE tomato jungle! 🙂

Thanks for stopping by!

-Sara

Tomato Supports

0

Posted by Sara | Posted in Outdoor Garden Progression, Outdoor Gardening | Posted on 22-08-2011

Tags: , ,

(I totally should have taken a picture – I might just sneak over to the neighbor’s and do it tomorrow.)

A friend of mine has built himself some awesome tomato supports! He took lath or about 1 inch wide wood and made square cages. They are at least 7-8 feet high (with more to spare under ground I’m sure.) They are awesome. They are sturdy enough to support indeterminate tomatoes which are topping 7 feet high and lots of tomato weight while they ripen and support for the plant and leaves. It looks awesome. Harvesting is easy. The plants COULD NOT be happier! I definitely need to build myself some of these for next year!!!!!

Strawberry Patch Maintenance

0

Posted by Sara | Posted in Outdoor Garden Progression, Outdoor Gardening | Posted on 20-05-2011

Tags: , ,

Hi everyone,

As you know I have a very small strawberry patch. 🙂 Last year it kind of went a little crazy and sent out little shoot off plants all over the garden! (This is a good thing.) So this Spring when those new plants came up I dug them up very carefully and put them back into the strawberry patch. They did not suffer for the transplanting at all and in fact they are going crazy again! I have TONS of blossoms woohoo!!!! They are so happy in there. I already have the bird netting up so that we can greedily have all the juicy berries to ourselves.

Here is a picture from right after I transplanted the babies:

strawberry patch

And here is one from today – approximately 3-4 weeks after the one above:

Yeay strawberries!!!!!!!!!!!!!!
If you have any questions please comment below – or start a thread in the forum.

Thanks for stopping by!

-Sara

Outdoor Bed Progress

0

Posted by Sara | Posted in Outdoor Garden Progression | Posted on 19-05-2011

Tags: , , , , ,

You may have heard that we had our first harvest from the garden the other night!

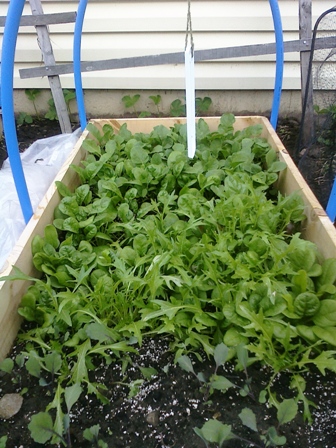
We did indeed! I planted radish, spinach, arugula and other salad greens and cabbage in one of the hoop houses at the beginning of March. Through many opening and closing of the hoop house plastic to maintain 55 degrees they made it through our last two snow falls and flurries with flying colors!

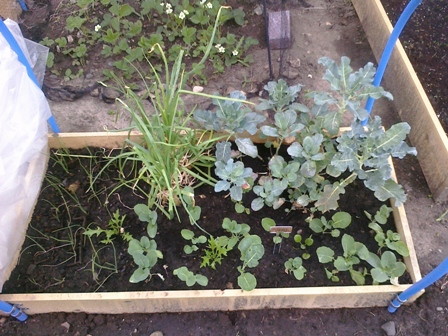
Here are some progress pictures (you can refer back to the original post about just the hoop houses to see what they looked like in March, but I bet you can all envision dirt pretty well!)

Onions and Broccoli - Transplants started Dec 2010 and Feb 2011

Don’t they look great!!! I am so glad that I did this!

If you have any questions please comment below or start a thread in the forum!

-Sara

Hoop Houses – Mini Greenhouses

0

Posted by Sara | Posted in In The Greenhouse, Outdoor Garden Progression, Outdoor Gardening | Posted on 18-05-2011

Tags: , , , , , , , , ,

So, This year to extend my Spring 2011 season and help my fragile ego recover from my major FAIL at building a greenhouse last fall I decided to get some lumber and build mini garden bed greenhouses.

This entailed me first constructing raised beds that were not off the ground, just allowed me to raise the dirt level and then gave me a sturdy structure to secure my metal clasps to for the plumbing plastic pipes I used for my plastic supports.

I used wood pieces from the value wood pile at my local lumber yard. This is junk lumber, normally cut to about 4-6 feet long with knots, or warped. It’s super cheap! I got some outdoor screws, and metal pipe loops, and flexible plumbers pipe – not PVC, it’s a bit more flexible than that. The name escapes me right now.

To construct the beds I just took boards of the same length, cut one in half and then screwed them all together to make a rectangle. I just screwed right into the long end of some of the boards. To make them last a bit longer I would suggest getting smaller 2×2 pieces to put in the corners to screw into. (That’s for the hoop house 2.0 version!) 🙂 I then decided how tall I wanted the hoop to go, and cut 2-3 pieces of the plumbers pipe to fit that. Then I secured each pipe across the bed using 2 metal loops on each side so that they would also be held upright and not tip front and back. After that I cut some of my greenhouse plastic with enough so that it would go about a half a foot over the ground (extra) on all sides. I used bricks to weight it down when I wanted it on and I was then able to have several options of how open or closed I wanted the beds.

I also secured a hanging thermometer in the middle of each bed so I could easily tell the temperature without opening the house itself. These little beds were about 100 degrees in the sun no matter what the temperature was outside when closed up tight!! I tried to maintain a temperature for the plants at about 55 degrees and that worked out just great!

In these beds I have onions, radishes, salad greens of all kinds, broccoli, and carrots. All cooler weather type things. That way if it was going to snow I wouldn’t have to stress out – and it DID snow on these beds – TWICE!!!

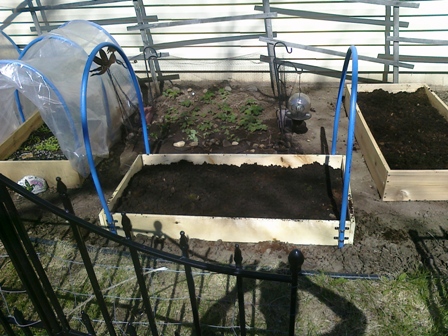
Here are some pictures:

Hoop Houses

Inside View

More Hoop Houses and Beds

These houses worked out so well that we just had our first harvest of spinach, radishes and arugula the other night as our dinner salad! See the next post that is coming up!

If you have any questions please comment below!!!!

Thanks for stopping by!

Sara Murray