Hoop Houses – Mini Greenhouses

0

Posted by Sara | Posted in In The Greenhouse, Outdoor Garden Progression, Outdoor Gardening | Posted on 18-05-2011

Tags: , , , , , , , , ,

So, This year to extend my Spring 2011 season and help my fragile ego recover from my major FAIL at building a greenhouse last fall I decided to get some lumber and build mini garden bed greenhouses.

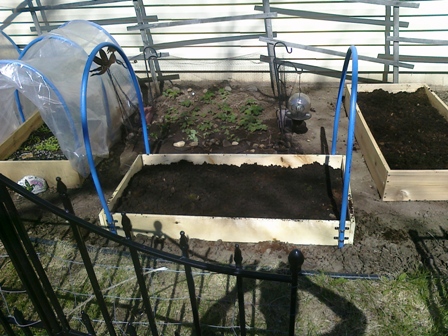
This entailed me first constructing raised beds that were not off the ground, just allowed me to raise the dirt level and then gave me a sturdy structure to secure my metal clasps to for the plumbing plastic pipes I used for my plastic supports.

I used wood pieces from the value wood pile at my local lumber yard. This is junk lumber, normally cut to about 4-6 feet long with knots, or warped. It’s super cheap! I got some outdoor screws, and metal pipe loops, and flexible plumbers pipe – not PVC, it’s a bit more flexible than that. The name escapes me right now.

To construct the beds I just took boards of the same length, cut one in half and then screwed them all together to make a rectangle. I just screwed right into the long end of some of the boards. To make them last a bit longer I would suggest getting smaller 2×2 pieces to put in the corners to screw into. (That’s for the hoop house 2.0 version!) 🙂 I then decided how tall I wanted the hoop to go, and cut 2-3 pieces of the plumbers pipe to fit that. Then I secured each pipe across the bed using 2 metal loops on each side so that they would also be held upright and not tip front and back. After that I cut some of my greenhouse plastic with enough so that it would go about a half a foot over the ground (extra) on all sides. I used bricks to weight it down when I wanted it on and I was then able to have several options of how open or closed I wanted the beds.

I also secured a hanging thermometer in the middle of each bed so I could easily tell the temperature without opening the house itself. These little beds were about 100 degrees in the sun no matter what the temperature was outside when closed up tight!! I tried to maintain a temperature for the plants at about 55 degrees and that worked out just great!

In these beds I have onions, radishes, salad greens of all kinds, broccoli, and carrots. All cooler weather type things. That way if it was going to snow I wouldn’t have to stress out – and it DID snow on these beds – TWICE!!!

Here are some pictures:

Hoop Houses

Inside View

More Hoop Houses and Beds

These houses worked out so well that we just had our first harvest of spinach, radishes and arugula the other night as our dinner salad! See the next post that is coming up!

If you have any questions please comment below!!!!

Thanks for stopping by!

Sara Murray
Chives Out of Control

0

Posted by Sara | Posted in Outdoor Gardening | Posted on 08-05-2010

Tags: , , , , , , , , ,

Hi everyone,

I figured this needs it’s own post so that people can search for it. 🙂

I have a chive plant (perennial) that I have had for about 4 years now. I love chives in dips and potatoes, but in a flower garden I am reconsidering my choice!

Chives can send out runners and their seeds take well and are very plentiful, and carry on the wind like dandelion seeds! So be careful where you plant one!

I am going to be constricting mine with a coffee can (surround the root ball by pushing the can into the ground around it.) as well as topping them off before the flowers turn t seed.

A flower bed should not smell like chives!!!

Weekend Yard and Garden Work

2

Posted by Sara | Posted in Outdoor Garden Progression, Outdoor Gardening | Posted on 03-05-2010

Tags: , , , , , , , , ,

I got the majority of my outdoor weeding done yesterday!

The vegetable garden was full of thistles and other odd looking plants I didn’t want in there. I also found a whole patch of volunteer tomatoes! They will need thinning so now I have a serious amount of tomato plants! The two strawberry plants are very happy and already have several large flowers. The radishes are doing great and the peas are as well. The onions are just up and about 2 inches above the ground now.

I didn’t do anything to my “knock-out” roses over the winter to protect them and they did just great. I even have a few buds already! I had to prune them back in to shape, but they are a lot larger this year. Roses are very hardy. I recommend them to anyone looking for an easy to care for perennial.

I also have babies breath, mallow root, and pink yarrow perennials in the vegetable garden. I will try to get some pictures up later on!

In the flower bed there were also thistles, and I have discovered that chives are thriving through out the entire garden out there!!! I need to put a can around the root ball and make sure I pick the tops before they seed so they don’t spread further. If that doesn’t work I will need to get rid of it. Nothing like a flower bed that smells strongly of chives!

Stay tuned for my green house plans as they have changed dramatically!

Thanks for stopping by!

Tomatoes – Staked

0

Posted by Sara | Posted in Indoor Garden Progression, Indoor Gardening | Posted on 06-03-2010

Tags: , , , , , , , , ,

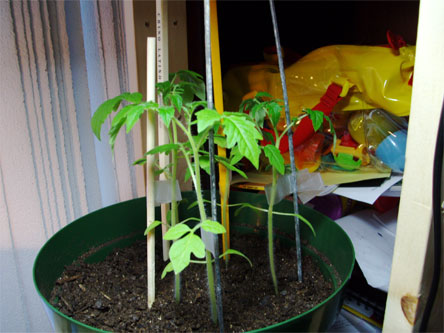
I promised you all a picture of my tomatoes after I staked them, so here it is:

As you can see, you don’t need anything fancy when the tomatoes are this small! I have used 3 chopsticks, and 2 cooking skewers and some (not so sticky) tape. You don’t have to invest in stakes and green tape. At least not at this stage. You can use things that you have around the house.

Make sure that you tape them loosely, they need to continue to grow. Make sure that the stakes are taller than the plant when they are firmly placed into the soil next to them. Be very gentle when you place the stakes into the soil, and don’t place them right next to the base of the plant. This can destroy a tender root system. You can see from the picture that I have placed my stakes about 1 inch from the base of each plant.

Happy gardening!!!